29 November 2013

DIY Wrap Bracelet - Take Two

Earlier this week I was doing some shopping in Covent Garden and I discovered Beadworks at 21 Tower Street, Covent Garden, WC2H 9NS.  It was so nice being able to visit and actual bead shop, rather than having to rely on websites and online ordering.  I bought supplies to have another go at making a wrap bracelet just like this one by Stella and Dot:


I bought more 1mm black leather cord, and 5mm Faceted Brass Rounded Cube Beads (Silver Plated).  The beads cost 50p for 20 beads.  I bought six packets to make a bracelet that would wrap three times around my wrist, and that was almost exactly what I needed.  When I compared the leather cord to the one I bought from Beads Direct, I noticed that their cord was better quality.  It seemed shinier and glossier.

I also bought a bobbin of Thick Bonded Nylon thread to use for the sewing.  This thread was strong, supple and didn't need to be waxed.  It was absolutely perfect.

Once again, I used this tutorial in the construction of my bracelet.

As mentioned in my first post about this wrap bracelet, I decided this time to use a single strand of sewing thread in the construction of the bracelet.  This resulted in a much neater finish.  The squared beads also sat really nicely in a flat row along the length of the bracelet.  Also, because the beads are brass, there is a lovely weight to the finished bracelet.  

Here is the finished bracelet (in a slightly out-of-focus shot).


Here you might be able to see how I did a little wrap with the cord when I tied off the button.


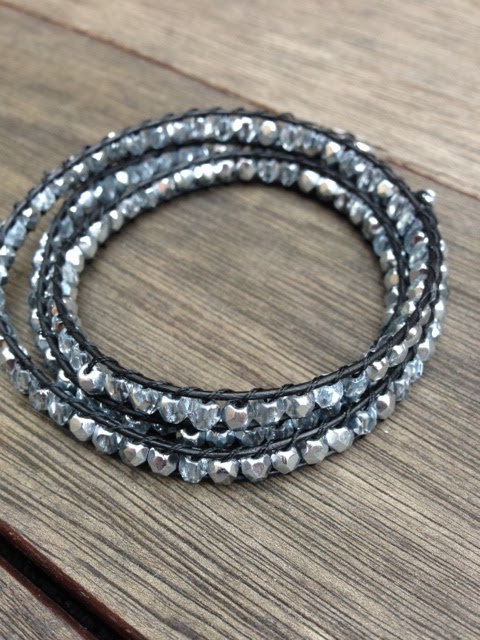
Again, this is a bit out-of-focus, but hopefully you can see how much neater the beads and the sewing are.


And, just to finish off, here's a picture of me wearing the bracelet.


I love this.  It's really cool, and I think it's very close to what I wanted to achieve.  Short of getting the exact beads used in the Stella and Dot bracelet, I think this is as good as it's going to get.
read more "DIY Wrap Bracelet - Take Two"

25 November 2013

Crafting for Christmas - Origami Tree

It's that season again, and I've started getting emails from Pinterest with cute Christmas craft ideas.  I saw this one on the weekend for Origami Christmas Trees.


The instructions are very clear, and this is not complicated origami.  With a little bit of help, Olivia (8 years) was able to make a tree.  The only supplies you need are paper and scissors.  You need either origami paper or regular coloured printer paper.  Make sure your paper isn't too thick, or you'll have trouble making precise folds.  I won't repeat the instructions here, because there is a brilliant photo tutorial on the Krokatak page

Here's a few of the trees we made.


The trees haven't made it to my mantlepiece yet, because the girls immediately appropriated them and made a forest for their Lego Friends people.

I really enjoyed the origami and have found a few more ideas I'm going to try.  Hopefully there will be a few more posts of other origami decorations soon.
read more "Crafting for Christmas - Origami Tree"

22 November 2013

Really Easy DIY Beaded Wrap Bracelet

A while ago I saw this bracelet at a Stella and Dot jewellery party:


I loved it, but just couldn't justify spending £32 on it.  This week I stumbled across this handy tutorial for making a beaded wrap bracelet:


It's a very similar look, and if I could find similar beads and a nice button, I think I could easily make my own.  The instructions were very clear and detailed, and there weren't many materials required.  I did a quick online search and found supplies at Beads Direct.  I bought 1mm black leather round cord for £1.49, and two packets of 4mm silver glass beads for £2.29 each:


I already had needle, thread, and some buttons.  Including postage, the total expenditure came to £8.06. I followed the Crafts Unleashed tutorial to make my own bracelet.  I did make a few changes, as I was having a little trouble with some of the techniques.

Firstly, I used a clipboard for holding the first loop firmly, then I pulled the leather cords tightly and taped them to the back of the clipboard.  This meant I had two neat, parallel rows of cord to work on.  When I left them dangling loose, I had trouble with cord and threads getting tangled and messy.

Secondly, I tied off each section of sewing thread, pulled the loose ends through the last bead sewn and trimmed them off.  I then started a new thread by feeding it under one piece of the cord, finding the middle point, and tying a single knot.  I then threaded the two loose ends onto a needle and started beading.  I tried the method outlined in the tutorial, but my threads kept getting tangled.  This was my first attempt.


Overall I'm really happy with how the bracelet turned out.  I'm going to have another try at making one that is more similar to the lovely Stella and Dot bracelet at the top of the page.  A few things I would do differently next time:

  • I need to do some research and find a more squared bead.  
  • Try using a thicker and stronger sewing thread, but just use one strand.   
  • Get some beeswax so I can wax my sewing thread.  I think it would make it much easier to work with, and less likely to tangle.  
  • Find some decent buttons.  
This was definitely a good learning experience, and I would absolutely recommend this tutorial for anyone wanting to make their own bracelet.
read more "Really Easy DIY Beaded Wrap Bracelet"